Setup and Installation #
Overview #
The use of the User Sync tool depends on your enterprise having set up product configurations in the Adobe Admin Console. For more information about how to do this, see the Configure Services help page.
Adobe Developer Console Setup #
The User Sync Tool uses the User Management API (UMAPI) to manage users an groups in the admin console. To use the User Sync Tool to manage your organization’s users and groups, you must first set up a UMAPI integration on the Adobe Developer Console.
Note: Only those with system administrator privileges can create UMAPI integrations. Contact an Adobe admin in your organization if you need access.
Refer to the Developer Console authentication docs to learn how to create a new integration. Be sure to select “User Management API” as the service to associate with the project. You will not be prompted to select product profiles (that feature does not apply to the UMAPI).
Once the integration is created, navigate to the credentails page. The Sync Tool needs three items to authenticate with the UMAPI:
- Organization ID
- Client ID
- Client Secret
If you have a JWT-based integration that you wish to migrate to Server-to-Server, refer to this guide.
Set up product-access synchronization #
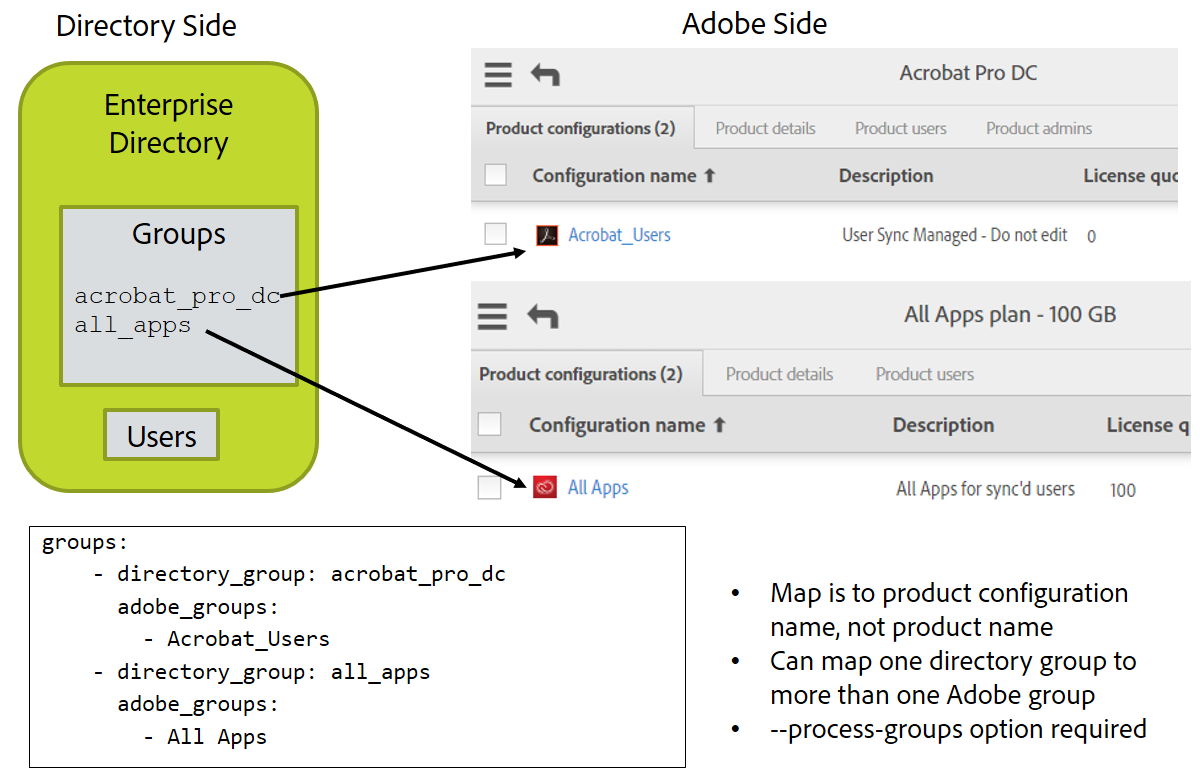
If you plan to use the User Sync tool to update user access to Adobe products, you must create groups in your own enterprise directory that correspond to the user groups and product configurations that you have defined in the Adobe Admin Console. Membership in a product configuration grants access to a particular set of Adobe products. You can grant or revoke access to users or to defined user groups by adding or removing them from a product configuration.
The User Sync tool can grant product access to users by adding users to user groups and product configurations based on their enterprise directory memberships, as long as the group names are correctly mapped and you run the tool with the option to process group memberships.
If you plan to use the tool in this way, you must map your enterprise directory groups to their corresponding Adobe groups in the main configuration file. To do this, you must ensure that the groups exist on both sides, and that you know the exact corresponding names.
Check your products and product configurations #
Before you start configuring User Sync, you must know what Adobe products your enterprise uses, and what product configurations and user groups are defined in the Adobe User Management system. For more information, see the help page for configuring enterprise services.
If you do not yet have any product configurations, you can use the Console to create them. You must have some, and they must have corresponding groups in enterprise directory, in order to configure User Sync to update your user entitlement information.
The names of product configurations generally identify the types of product access that users will need, such as All Access or Individual Product Access. To check the exact names, go to the Products section in the Adobe Admin Console to see the products that are enabled for your enterprise. Click a product to see the details of product configurations that have been defined for that product.
Create corresponding groups in your enterprise directory #
Once you have defined user groups and product configurations in the Adobe Admin Console, you must create and name corresponding groups in your own enterprise directory. For example, a directory group corresponding to a “All Apps” product configuration might be called “all_apps”.
Make a note of the names you choose for these groups, and which Adobe groups they correspond to. You will use this to set up a mapping in the main User Sync configuration file. See details in the Configure group mapping section below.
It is a best practice to note in the description field of the Product Configuration or User Group that the group is managed by User Sync and should not be edited in the Admin Console.
Installing the User Sync tool #
System requirements #
The User Sync Tool is self-contained and does not require any external tools.
We recommend running a pre-built binary, which can be obtained on the latest release page.
The User Sync Tool does not have any specific system requirements, but we do recommend running on a server or VM with at least 4GB of avaiable RAM.
Installation #
- Create a directory where the sync tool will run
- Windows example:
C:\adobe_user_sync - Linux example:
~/adobe_user_sync
- Windows example:
- Get the latest release
- Binary downloads are found in the “Assets” box immediately below the release notes
- Be sure to select the correct release for your platform - the naming convention is
user-sync-[VERSION][EDITION]-[PLATFORM]. Windows releases are packaged in.zipformat and Linux releases are packaged in.tar.gzformat. - NOTE: Releases tagged with the
-noextedition tag ship with extension support disabled. Do not install this variant unless that restriction is desired.
- Extract the UST archive to the directory created in step 1.
- Windows filename:
user-sync.exe - Linux filename:
user-sync
- Windows filename:
- Generate the example configuration files
- From the command line, run the command
./user-sync example-configin the sync tool directory created in step 1 - The tool will prompt you to specify the filename of each file. Press Enter for each to accept the default filenames.
- For additional example configuration files and CSV templates, download
examples.ziporexamples.tar.gzfrom the release asset list (see step 2)
- From the command line, run the command
- Make sure the UST runs in your environment by running
./user-sync --helpor./user-sync --version
Security Considerations #
Because the User Sync application accesses sensitive information on both the enterprise and Adobe sides, its use involves a number of different files that contain sensitive information. Great care should be taken to keep these files safe from unauthorized access.
User Sync release 2.1 or later allow you to store credentials in the operating system’s secure credential store as an alternative to storing them in files and securing those files, or to store umapi and ldap configuration files in a secure way that you can define. See section Security recommendations for more details.
Configuration files #
Configuration files must include sensitive information, such as your Adobe User Management API key, the path to your certificate private key, and the credentials for your enterprise directory (if you have one). You must take necessary steps to protect all configuration files and ensure that only authorized users are able to access them. In particular: do not allow read access to any file containing sensitive information except from the user account that runs the sync process.
If you choose to use the operating system to store credentials, you still create the same configuration files but rather than storing the actual credentials, they store key ids that are used to look up the actual credentials. Details are shown in Security recommendations.
If you are having User Sync access your corporate directory, it must be configured to read from the directory server using a service account. This service account only needs read access and it is recommended that it not be given write access (so that unauthorized disclousre of the credential does not allow write access to whomever receives it).
Certificate files #
The files that contains the public and private keys, but especially the private key, contain sensitive information. You must retain the private key securely. It cannot be recovered or replaced. If you lose it or it is compromised, you must delete the corresponding certificate from your account. If necessary, you must create and upload a new certificate. You must protect these files at least as well as you would protect an account name and password. The best practice is to store the private key file in a credential management system, in the operating system secure storage, or use file system protection so that it can only be accessed by authorized users.
Log files #
Logging is enabled by default, and outputs all transactions against the User Management API to the console. You can configure the tool to write to a log file as well. The files created during execution are date stamped and written to the file system in a folder specified in the configuration file.
The User Management API treats a user’s email address as the unique identifier. Every action, along with the email address associated with the user, is written to the log. If you choose to log data to files, those files contain this information.
User Sync does not provide any log retention control or management. It starts a new log file every day. If you choose to log data to files, take necessary precautions to manage the lifetime and access to these files.
If your company’s security policy does not allow any personally identifiable information to be persisted on disk, configure the tool to disable logging to file. The tool continues to output the log transactions to the console, where the data is stored temporarily in memory during execution.
Support for the User Sync tool #
Adobe Enterprise customers can use their normal support channels to get support for User Sync.
Since this is an open source project, you can also open an issue in GitHub. To help with the debugging process, include your platform, command line options, and any log files that are generated during the application execution in your support request (as long as they contain no confidential information).